Step 1 (Continued) – Buy Guitar Accoutrements

Apparently there is a lot of extra stuff you need when you want to play guitar.  Apparently hair barrettes don’t make appropriate picks.  Also, guitars that are in tune sound better.  This is all news to me.

So, I find a local music shop and ask for help.  He shows me a crazy awesome electronic tuner with an amazing display that costs $30.  I say that’s a bit expensive, so he shows me the same option with a less amazing display that’s only $15.  It clips on the head of the guitar and analyzes the frequency of vibrations.  Super easy to use. I take that and a bag of medium thickness Fender picks.

tuner

March – Guitar Month

Learning to play guitar was on the original list of things I wanted to do.  I even had a guitar long long ago.  I’ve known several amazing musicians over the years and don’t know why I never took advantage of the opportunity to learn.  Well, I guess it’s never too late.  I know that I am not really going to learn guitar to play guitar in 30 days, but I do have goals.

1. Buy a guitar.

2. Practice.

3. Play this song.  http://www.youtube.com/watch?v=UTgg3Z7JwTE

In Retrospect of Crafty Month

As per usual, 30 days is just not enough time!  I finished a large suitcase project I’ve put on hold for about 2 years.  I revamped a window pane that I’ve been hoarding for a while.  I bought a lamp for $6.99 from Goodwill that I painted before realizing it doesn’t work.  Then I threw it away in annoyance.

But fear not, dear reader.  My little sister is getting married and I’ve volunteered to assist in crafty decorating.  So more craftiness is on the horizon!

The Window Pane Project

About 6 months ago, I bought a salvaged window pane from the ReStore.  It was $15, I think?

Window pane

I thought it was really cute, but I had not idea what to do with it, until I went to The Craft Warehouse.  There were two aisles devoted entirely to making your own organization boards.  Peel and stick chalkboard and dry erase paper, calendar inserts, recipe and menu planning, magnet boards, cork/magnet board combos… I was overwhelmed with choice.  Decided to get two chalkboard pages, two metal strips for magnets, and make my own calendar.

photo (58)


There are 6 panels on the window, so I was going to use the actual window panes for dry erase markering.  I cut out the exact shape of the pane in the chalkboard paper and stuck it right on.  I glued the metal strips directly to the window.  I made a blank 5 week calendar and taped it on the back of the window panel, this way I can write directly on the window and erase or change easily.  I found random hooks in my toolbox and screwed them to the bottom of the frame.  I also had to install the wire hanger, which was also in my toolbox, but you can get at Home Depot.  Done-zo!

photo (56)

The Suitcase Project

Anyone who has known me for any length of time knows that I love suitcases.  Most any suitcase, but particularly the hard case Samsonites and small top handle train cases.  I snatch them up any time I see them at Goodwill and hoard them in the back of my closet.  Usually they are pretty gross.  Super smelly and who knows how many years old.  Once filled with a stranger’s dirty laundry and exploding makeup, why would anyone see such a treasure?  Well, I don’t know.  It’s definitely weird.  I guess something about them makes me nostalgic.

What do I do with all these suitcases, you ask?  First, I completely gut them.  Get all that smelly, stale, grandma fabric outta there.  Once it’s empty and cleaned out, there’s a clean slate to paint, decoupage, or adorn the inside and outside any way you want.  When you’re done, just slap on a coat of varnish and you’re clear for take off, Lady Baltimore.

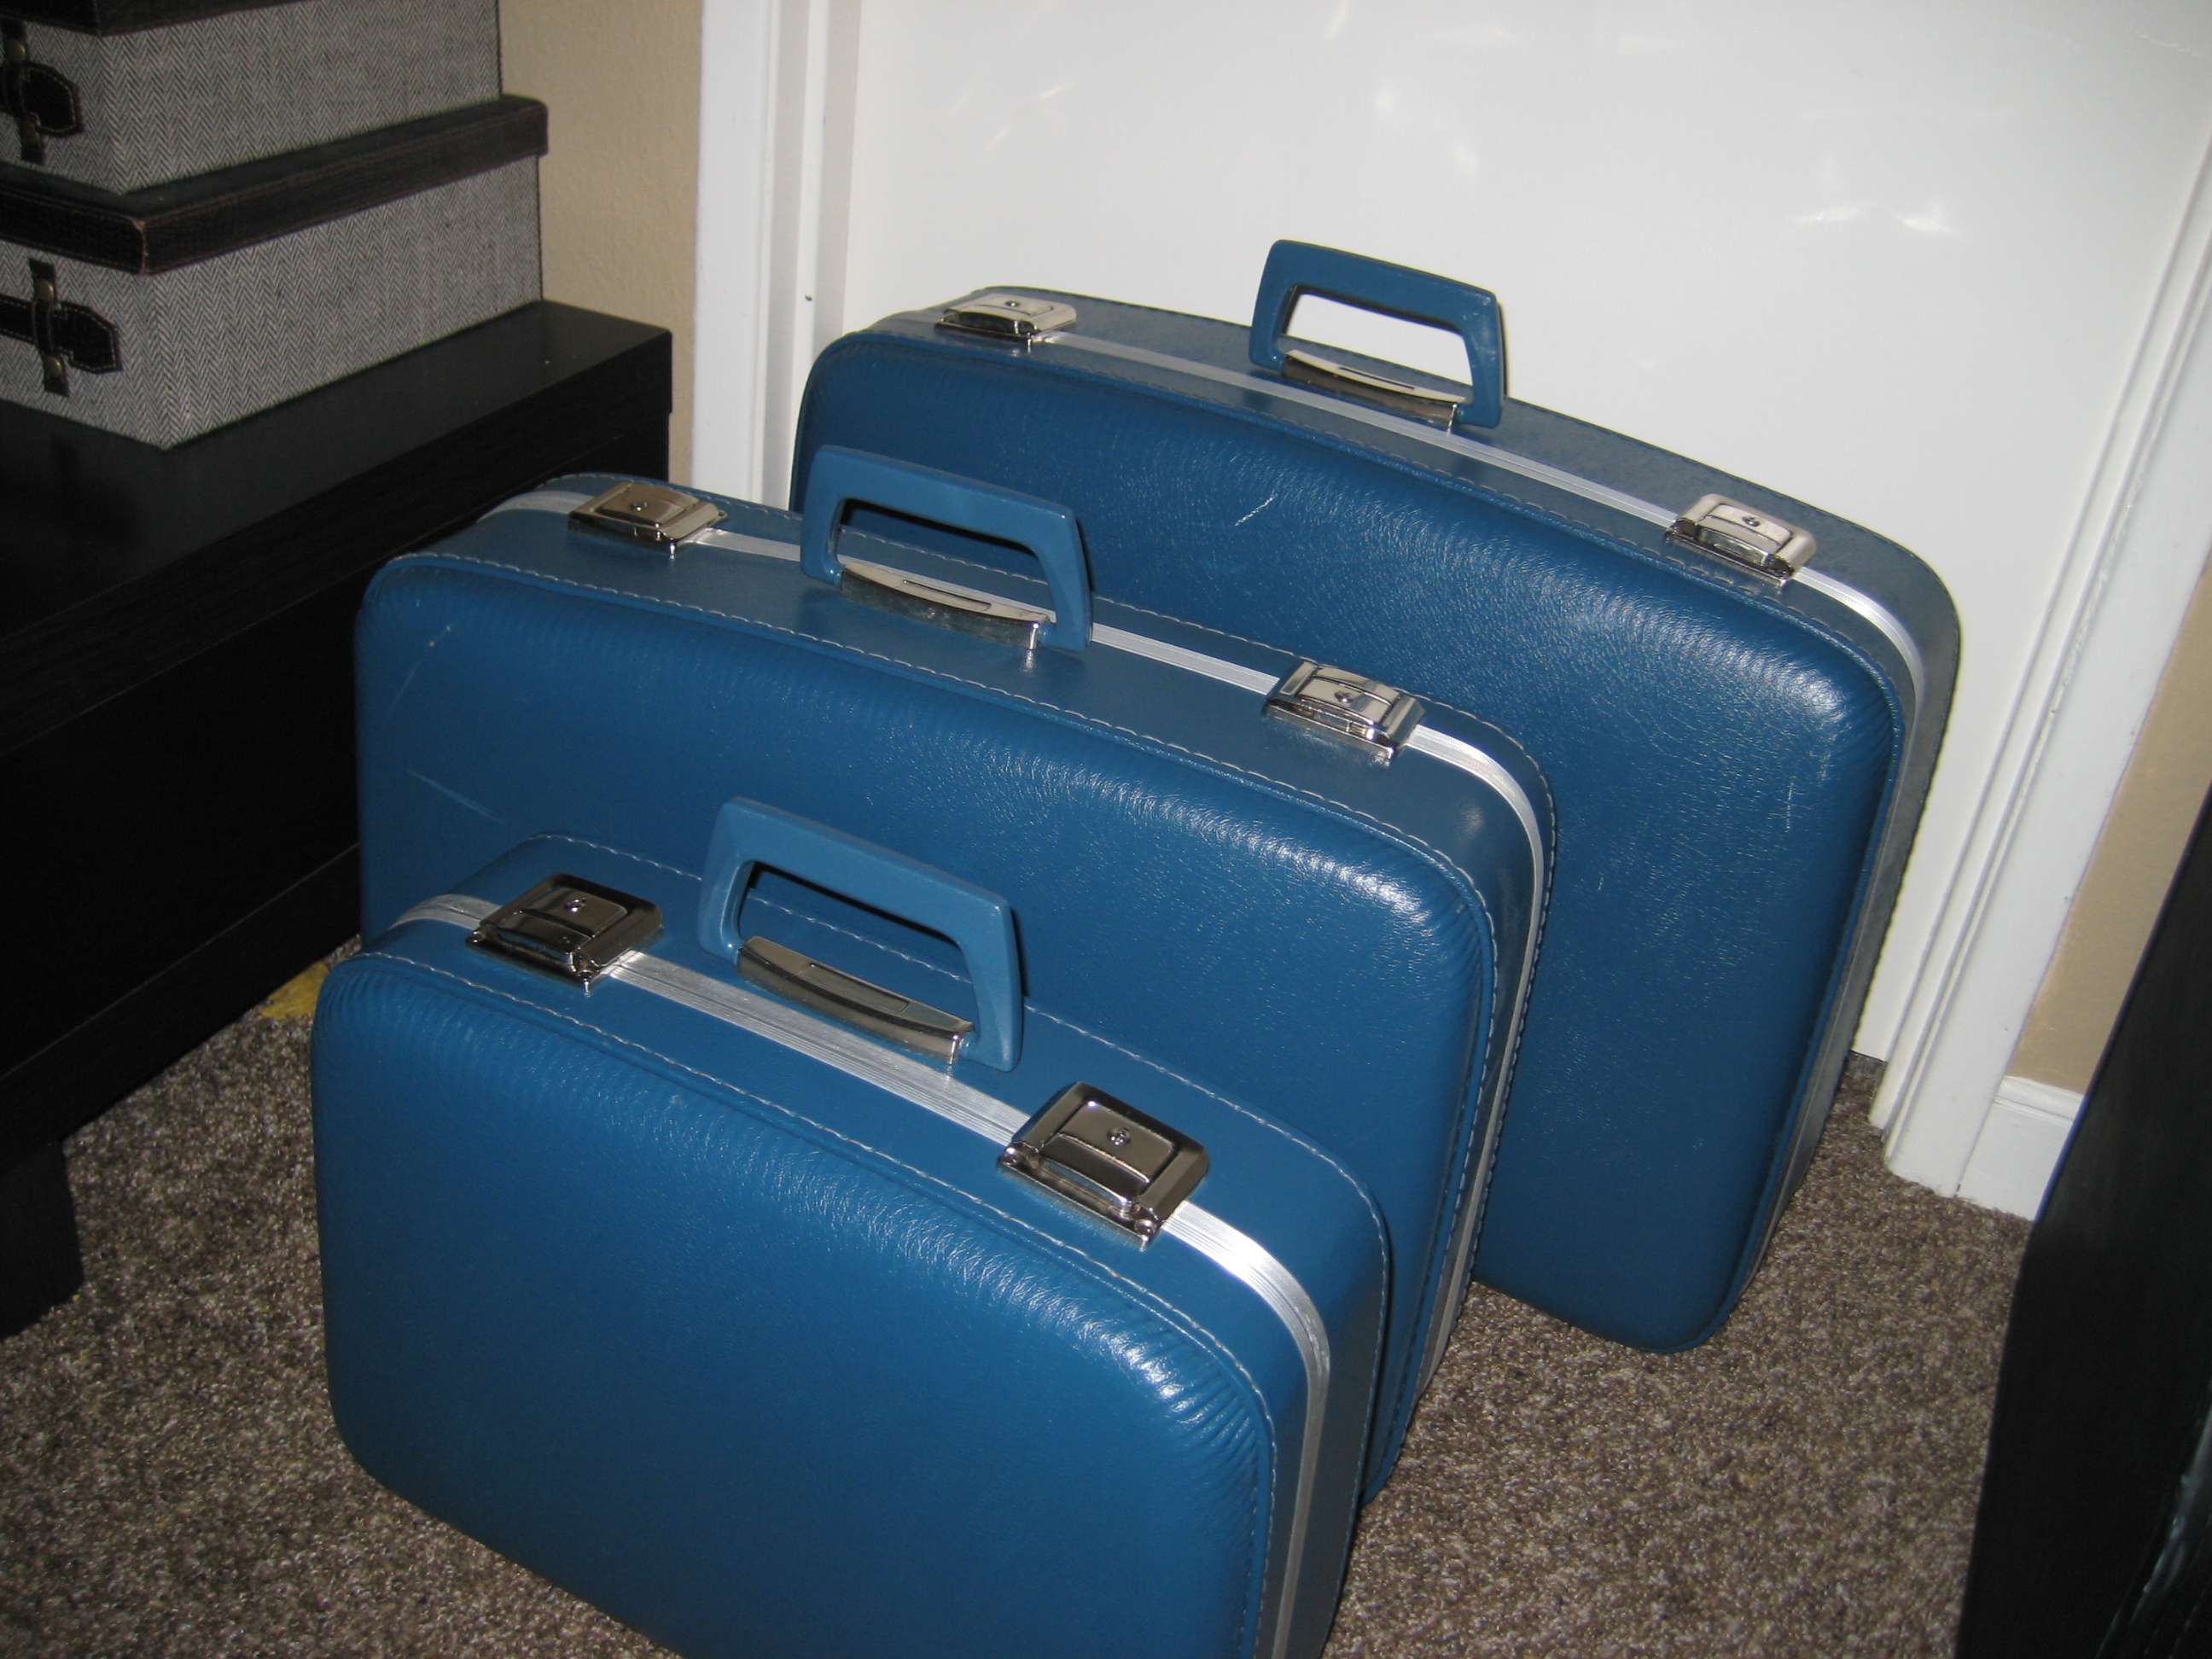
I found a set of three suitcases several years ago and completed 2/3.

Suitcase Project 2

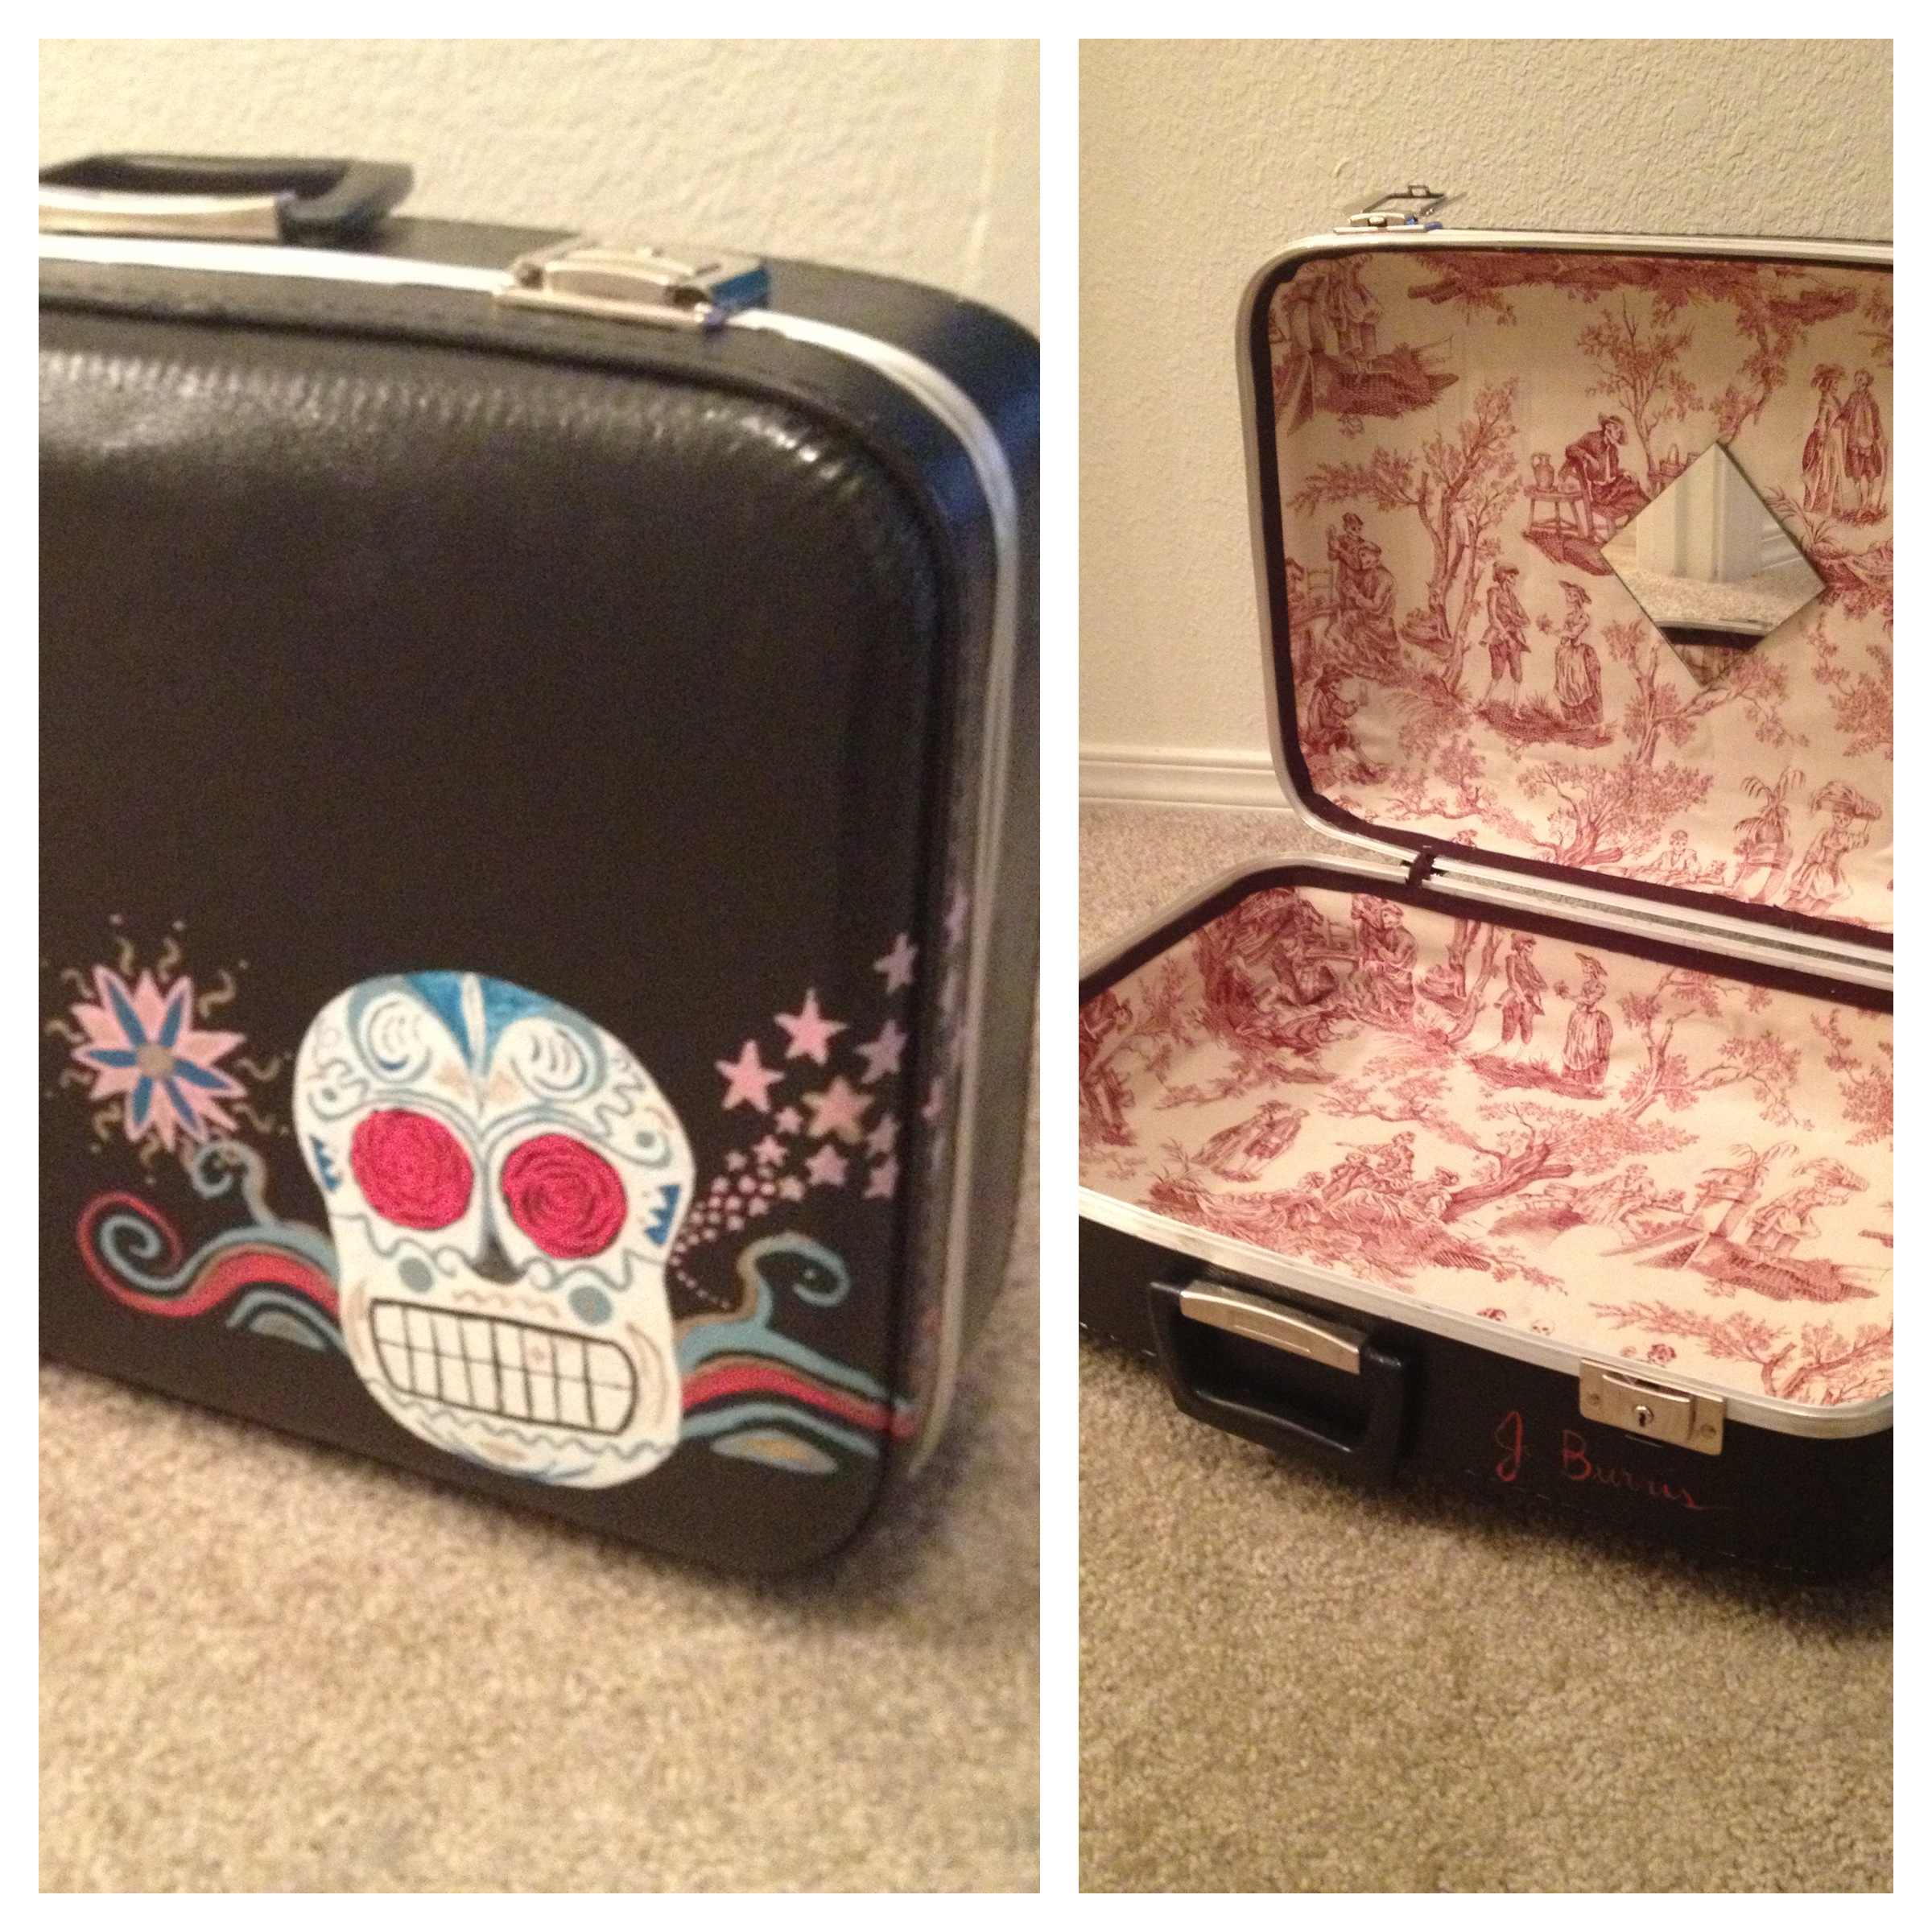
This one was Day of the Dead inspired.  Sugar skull on the front and a French toile fabric with skeleton people.

photo (59)

This one I made for my favorite 3 year old.  It’s Swedish horses.

photo (60)

The third suitcase that came with this set was never finished.  I started to paint it black, but never completed it.  Until now.  (Please begin playing Europe’s The Final Countdown now.)

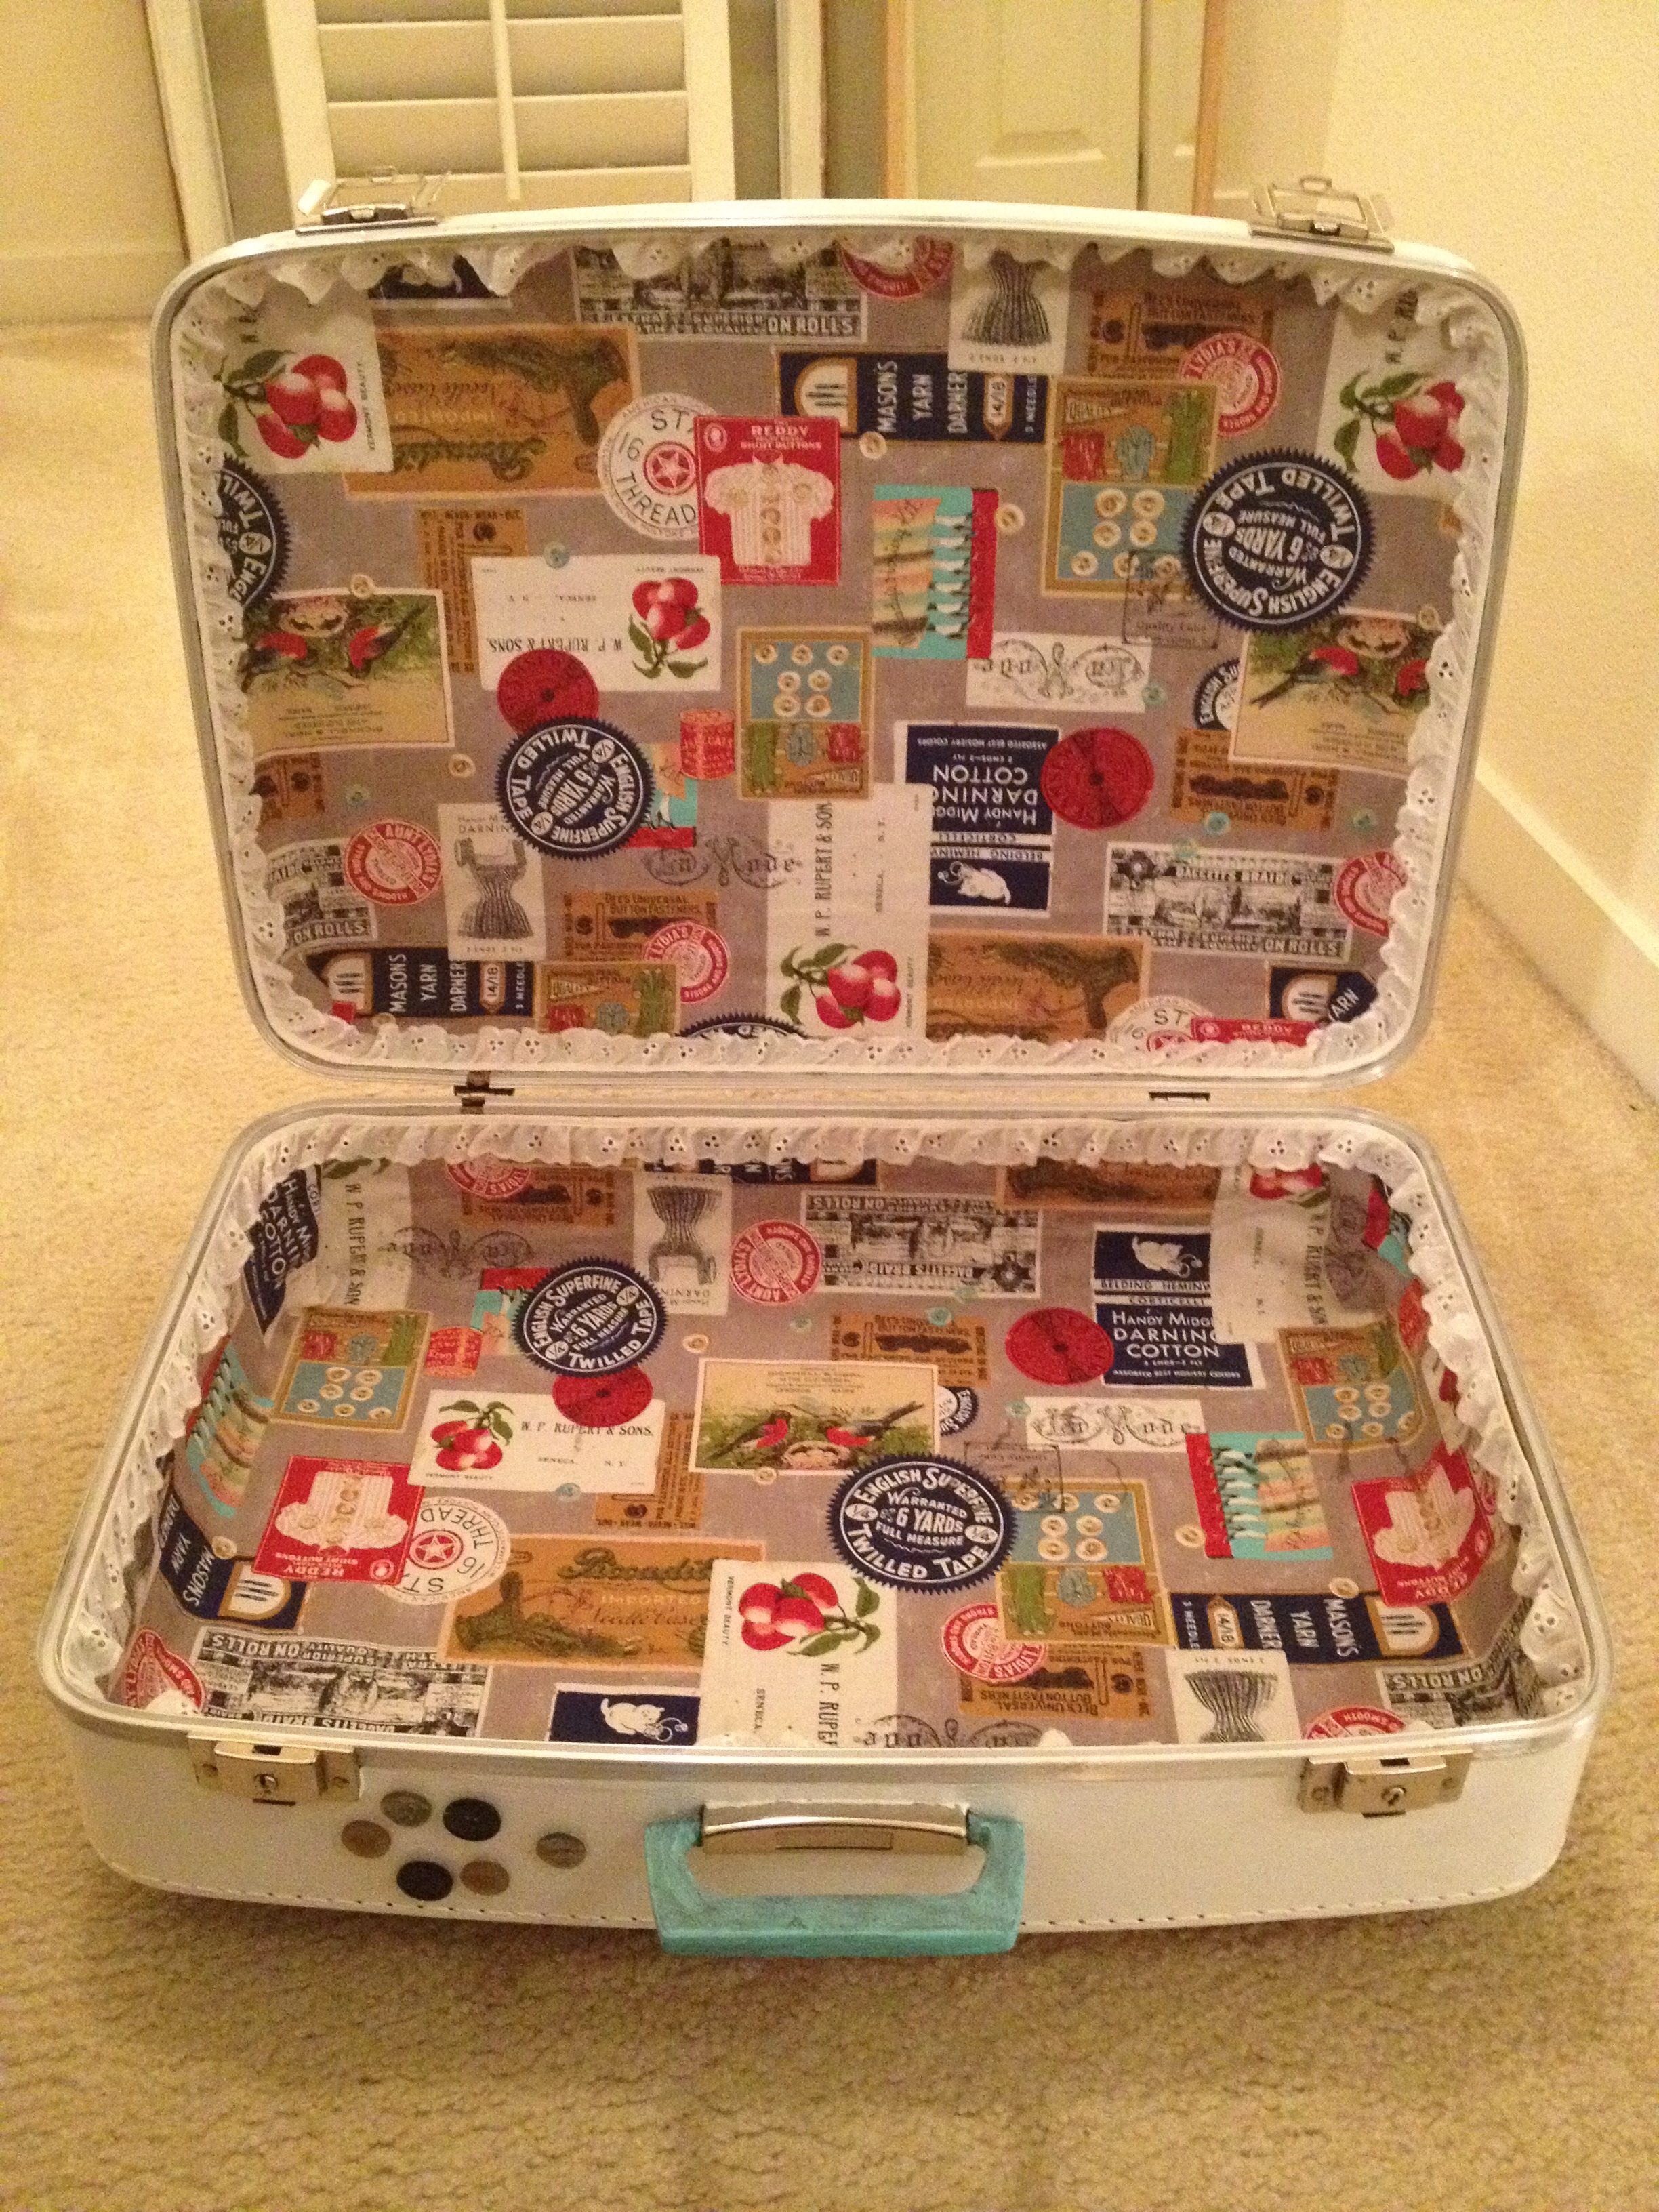
I had to sand off a lot of the black paint I applied about 2 years ago.  Then I painted it white with an outdoor latex paint I had left over from another project.  The I used Modge Podge to adhere a postcard themed wrapping paper from The Paper Source to both sides.  Used ribbon to border the paper and wrap the handle.  Hot glued some buttons to go with the sewing motif from the lining.  And voila!

photo (61)


photo (62)

photo (57)

I really need to work on getting in-the-process pictures.

February – Crafty Projects Month

There is something about February, and winter in general, that makes me want to stay inside.  The sun is only out for brief moments and I want to follow suit. I want to flip the switch that turns my fireplace on and drink some tea.  Perfect timing for some indoor activities.  Half finished projects fill almost every closet of my apartment.  Things I bought or held onto for months (or years) that I knew I could do something with someday.  I know I won’t be able to finish all my crazy projects this month, but I can at least make a dent.

In Retrospect of Snow Sports Month

As usual, lots of things I didn’t get to accomplish and still want to do. Snowshoeing is definitely one of those things.  A recent recommendation of making a snow angel is also something that sounds super adorable and fun.  So, there’s still a few good months of winter left and I might just be able to sneak some more snowy adventures in.

There were also really awesome things that I did get to do.  I went up to Mount Hood for the first time.  Went cosmic tubing and zip lining and had a freaking blasty blast.  Went ice skating on a lady-date.    And… uh… bought a groupon to take a snowboarding lesson… and… bought some winter gear…  um… okay, I guess that’s it.  But what I did do was pretty awesome, so BOOM!

January 29 – Ice Skating

Bought a Groupon for ice skating at Lloyd Center.  It was $10 for two people with skate rental. Took my “special friend” Katie.  (Side note: this is her new nickname and she will forevermore be referred to as such.  Mainly due to my coworkers thinking I might be a lesbian because of all the lady-dates we go on.  Oh, and maybe also because I brought power tools in to work to install a bulletin board, but whatevs.  It’s probably the lady-dates.)  First things first.  Time to lace up!

Image

Image

Ready to roll!  It’s been about 20 years since I’ve put on ice skates, but it did come back pretty quickly, after some stumbles.

Image

We skated for about an hour, then stood enthralled as the Zamboni made it’s graceful loops around the rink.  Why can I not look away?!?  Skated for another half hour or so and asked three different people to take our picture before winding up with something that was acceptable.

Image

Ice skating was really fun and a good workout.  Taking your skates off at the end feels incredibly awkward and I was immediately sore.  But I did get a good Toe Pick in!

January 19 – Cosmic Tubing and Zip Line

I was excited all week about this amazing adventure.  Got off work at 5pm.  Met Katie and her 12 year old cousin at my place at 6pm.  Packed up some snacky-treats and hit the road to Mount Hood.

Image

It took about an hour to get to Ski Bowl and we only hit a little bit of snow on the road.  My little Malibu Maxx handled like a champ.  We got there a little before 8pm and got tickets to tube and zip line.  They were $55 each. Kinda expensive.  We were in the rental office when one of the cashiers said, “they are doing fireworks.  You better hurry.”  Coincidentally, the speed at which I could exit the rental shop directly correlated with the speed at which the cashier could move us through.  Surprise!  We missed the fireworks.  Also, we asked that same genius to take a picture of us and this is the gem we walked away with.

Image

We finally get ready to hit the slopes and can’t find any tubes.  We decide to wait for them to bring more tubes out by a shed next to a very high strung mother and her impatient kids.  Not a great start to the evening.  We finally get our tubes and struggle through the crowd to go on our first run.  The three of us hold each others’ tubes and the guy at the top of the hill asks us if we want to spin.  Uh, hell yeah, we want to spin?!  We go flying down the hill and forget to plant our feet at the end which sends us straight into the fencing at the bottom.  We get a slight reprimand, and go about our merry way making it back up the airport style conveyor belt to the top again. So many people!

Image

Then, miraculously, we showed up at the zip line station right as they are setting up.  We get suited up with fashionable and wedgie-inducing harnesses and get ready for our zip.  Johno is our guide.  He is a super pumped kid who loves his job.  Really, loves his job.  He takes elaborate measures to ensure each “zipper” is secured and emotionally stable and ready for the journey ahead of them.  We are ready to go and looking tough!

Image

The zip line was super crazy fun.  The second time I went, I flipped upside down and zipped.  Difficult, but awesome.  Super fun and exhilarating.

After the zip line, all the families had dissipated and the slopes were super empty.  We tubed non-stop for another hour and a half and it was so freaking awesome.  I felt like a kid.  I was so stoked and smiling ear to ear.  So freaking cool.

Image